In this post, let's go over the famous
laravel medialibrary package developed by Spatie. This package can associate all sorts of files with your Eloquent models.
Thus if you are looking to associate an avatar image with your user model, A set of images with your Post model on your blog project or some other product-image for your Product models in e-commmerce project. This package will come handy.
Let's dive into the real-world usage of this package by considering an e-commerce application where we want to associate product images with the Product model.
Before we dive into the package details, Make sure you have the following ready.
1. Fresh Laravel Project Installation
2. Laravel project connected to the database.
Getting the Project Ready
Let's create a dummy application for our example with a single Model named Product. Run the following command to generate the Model along with the migration file and a resource controller.
php artisan make:model Product -mr
This command will generate model file
Product.php, a resource controller
ProductController.php and a migration file in the database folder
create_product_table.php
For the demo project let's add two fields in the
product table schema
name and
description.
Here is how the schema looks like
Schema::create('products', function (Blueprint $table) {
    $table->bigIncrements('id');
    $table->string('name');
    $table->string('description');
    $table->timestamps();
});
Note: We want to associate a product image with our product model but we have not added a separate column for that in our product schema since it will be handled by the medialibrary package.
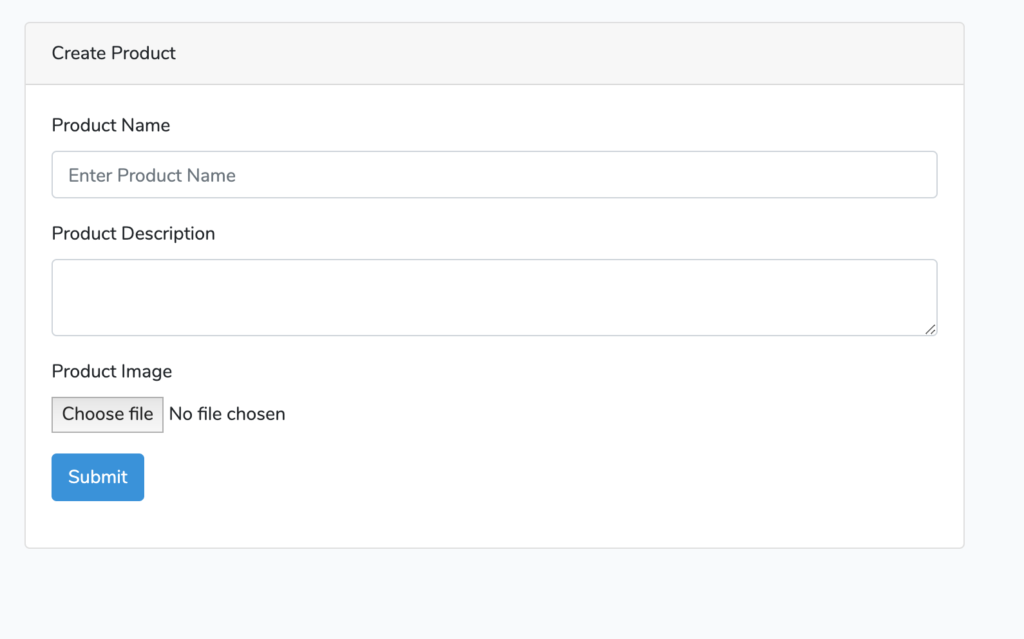
As a part of getting the project ready, I have set up the create view file and store method to create a new Product. Here is how the product form looks like.
In the next step, let's install the medialibrary package.
Package Installation
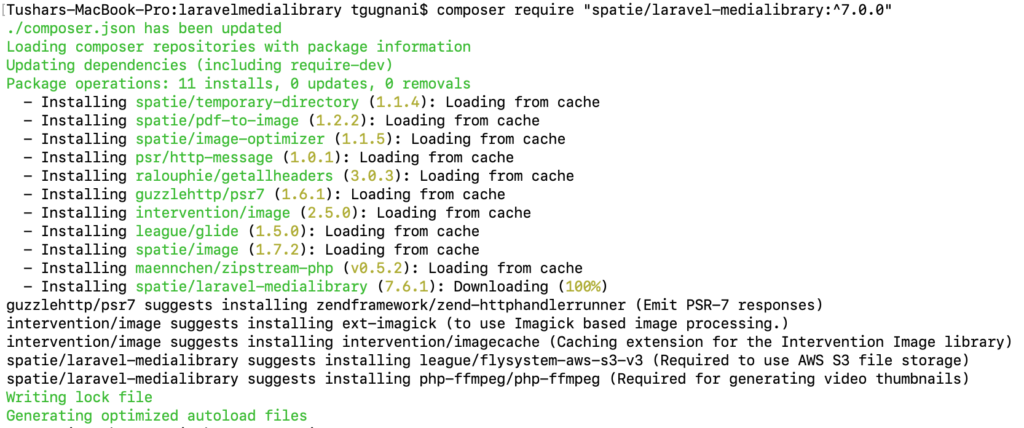
To install the medialibrary package in your Laravel application. Navigate to your project directory in the terminal / command-line and run the following command.
composer require "spatie/laravel-medialibrary:^7.0.0"
On the writing of this tutorial latest version of
laravel-medialibrary is 7.0 and hence the version number in the composer command.
Once the package is installed, run the following command to copy the migration file from to package directory to your project directory and also to run the fresh migration command.
php artisan vendor:publish --provider="Spatie\MediaLibrary\MediaLibraryServiceProvider" --tag="migrations"
php artisan migrate

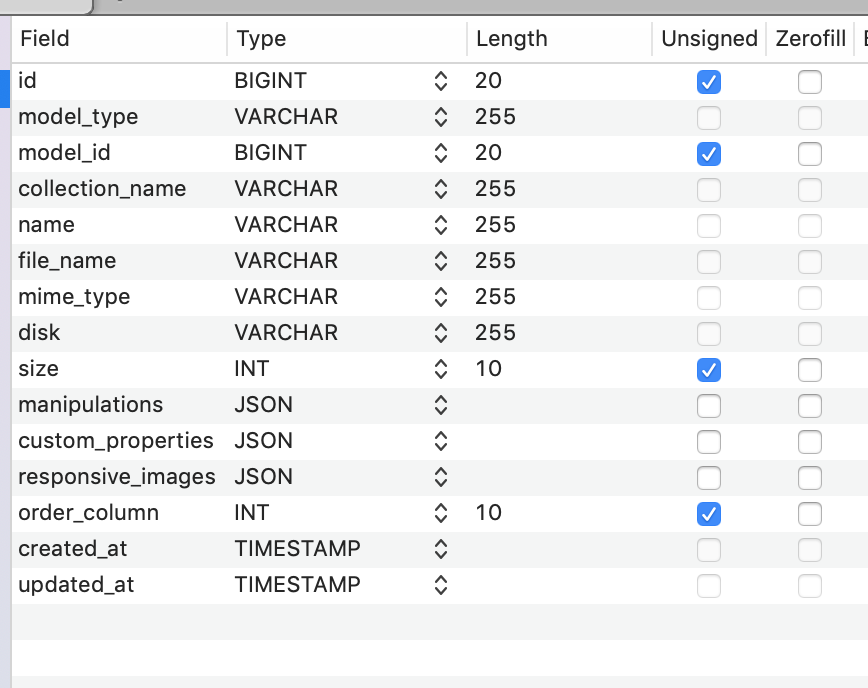
Once you run this command, the migration file will create a new table in your database named '
media', This is where your media information will be stored.
We are done with package installation, let's move on to the next section where we will learn the changes that need to done to the Model class to use medialibrary API methods.
Preparnig Product Model
To be able to use the API methods provided by laravel/medialibrary on our model. We need to make a few changes to our Model class.
<?php

namespace App;

use Illuminate\Database\Eloquent\Model;
use Spatie\MediaLibrary\HasMedia\HasMedia;
use Spatie\MediaLibrary\HasMedia\HasMediaTrait;

class Product extends Model implements HasMedia
{

    use HasMediaTrait;

}
We have made two changes to our Product model.
1. Product model now implements the
hasMedia interface
2. Product model now uses
HasMediaTrait.
That's all, we can now invoke medialibrary API methods on our Product model object.
Associating Files with Models
Let's get into the next section, here we will get into how to associate the media files with Eloquent Models.
Since we already have our Model prepared to use medialibrary we can call method
addMedia provided by medialibrary on product object.
Here is how you can associate a product image after creating the new product.
    public function store(Request $request)
    {
        //Populate model
        $product = new Product($request->except(['image']));

        $product->save();

        //Store Image
        if($request->hasFile('image') && $request->file('image')->isValid()){
            $product->addMediaFromRequest('image')->toMediaCollection('images');
        }

        return redirect("/products/{$product->id}")->with('success', 'New Gift Added !');
    }
Here I have used
addMediaFromRequest method and then added image to collection named
images
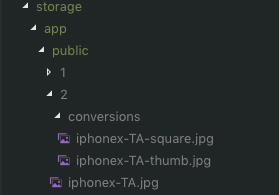
With this the file uploaded will be stored in a folder inside
storage >
app >
public.
There are other API methods to addMedia to your media collection depending upon your need.
addMedia($file) : Add a file to the medialibrary. The file will be removed from it's original location.
addMediaFromUrl(string $url) : Add a remote file to the medialibrary.
addMediaFromRequest(string $keyName): Add file from the current request to the medialibrary
addMultipleMediaFromRequest : Add multiple files from the current request to the medialibrary.
You can see the details for these methods in the
MediaLibrary API documentation.
Retrieving Files on View Page
Next Up, Let's learn how we can show the image uploaded on the view page.
mediaLibrary has provided different API methods to get data of the media associated with a Model. Since we just need to get the URL of the associated image we will use method
getFirstMediaUrl();
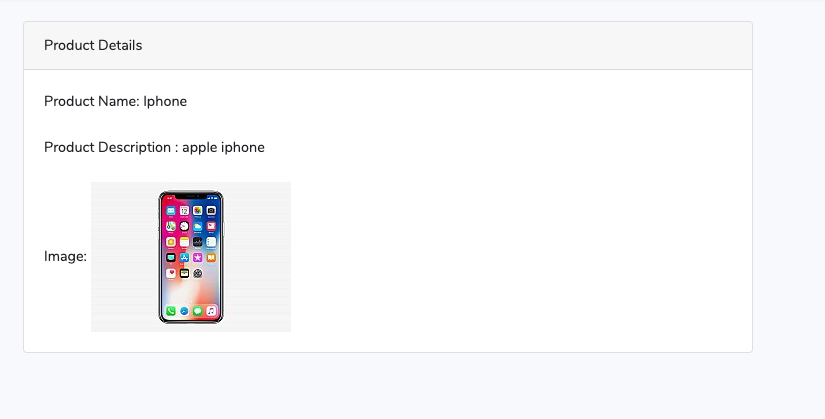
Here is the view page code where we show the product image.
@extends('layouts.app')

@section('content')
<div class="container">
    <div class="row justify-content-center">
        <div class="col-md-8">
            <div class="card">
                <div class="card-header">Product Details</div>

                <div class="card-body">
                     Product Name:  {{$product->name}} <br/><br/>

                     Product Description : {{$product->description}} <br/><br/>


                     Image: <img src="{{$product->getFirstMediaUrl('images')}}" />
                </div>
            </div>
        </div>
    </div>
</div>
@endsection
As you can see we get the product image URL by
$product->getFirstMediaUrl.
There are several other
retrieval methods provided by mediallibrary.
Note that to view the files in the browser you need to make the files public that is stored in the storage directory, you need to run the following command on your project root in terminal/command-line.
php artisan storage:link
Also, you need to change the default filesystem to
public instead of
local in
filesystem.php config file inside
config directory.
Resizing Images
When you upload images, if you are looking to alter the size of the image for the purpose of saving it as a thumb size image or any other size, medialibrary provides a very easy implementation for this.
You just need to add a new method in your Model named
registerMediaConversions , and define your conversions in that method.
Here is how my Product method looks like with two size conversions.
<?php

namespace App;

use Spatie\MediaLibrary\Models\Media;
use Illuminate\Database\Eloquent\Model;
use Spatie\MediaLibrary\HasMedia\HasMedia;
use Spatie\MediaLibrary\HasMedia\HasMediaTrait;

class Product extends Model implements HasMedia
{

    use HasMediaTrait;

    protected $guarded = [];

    public function registerMediaConversions(Media $media = null)
    {
        $this->addMediaConversion('thumb')
              ->width(200)
              ->height(200)
              ->sharpen(10);

        $this->addMediaConversion('square')
              ->width(412)
              ->height(412)
              ->sharpen(10);
    }
}
When you upload the image the converted image will be stored in
conversions folder.
And you can grab the URL of a converted image with getFirstMediaUrl method
->getFirstMediaUrl('images', 'thumb');.
Here is how I get the url of thumb image.
<img src="{{$product->getFirstMediaUrl('images', 'thumb')}}" />
That's All about uploading, retrieving and resizing images with Spatie medialibrary package.
Here is the
Github URL to the demo project.