This article lays out steps of integrating the Bootstrap based layout to Laravel Project, using Laravel's blade templating engine.
Requirements
- Installed Laravel Project on your Local.
- Bootstrap v.4 JS and CSS File.
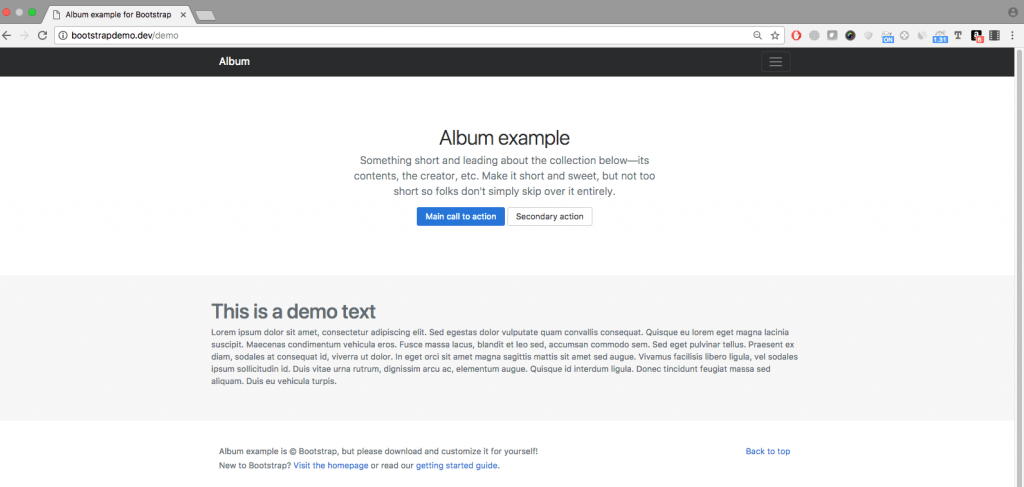
- Desired Bootstrap Layout, I am using Album Example For Bootstrap for this demo.
Create layout file.
The initial setup of Laravel comes with a default folder structure and the views folder contains only a single file.
Let's start by creating necessary files and folder's where we will keep our layout file and structure. Create a folder
layout inside your resources > views folder. This folder will contain our main layout and other files that will be included inside the layout. Create another folder
partials we will use this folder to keep partial files (header, footer etc.) that will be used by our layout file.
Let's first take some time to understand that your webpage or layout consist of different parts which we should keep in separate files so that managing them and making changes in future makes our life easier.
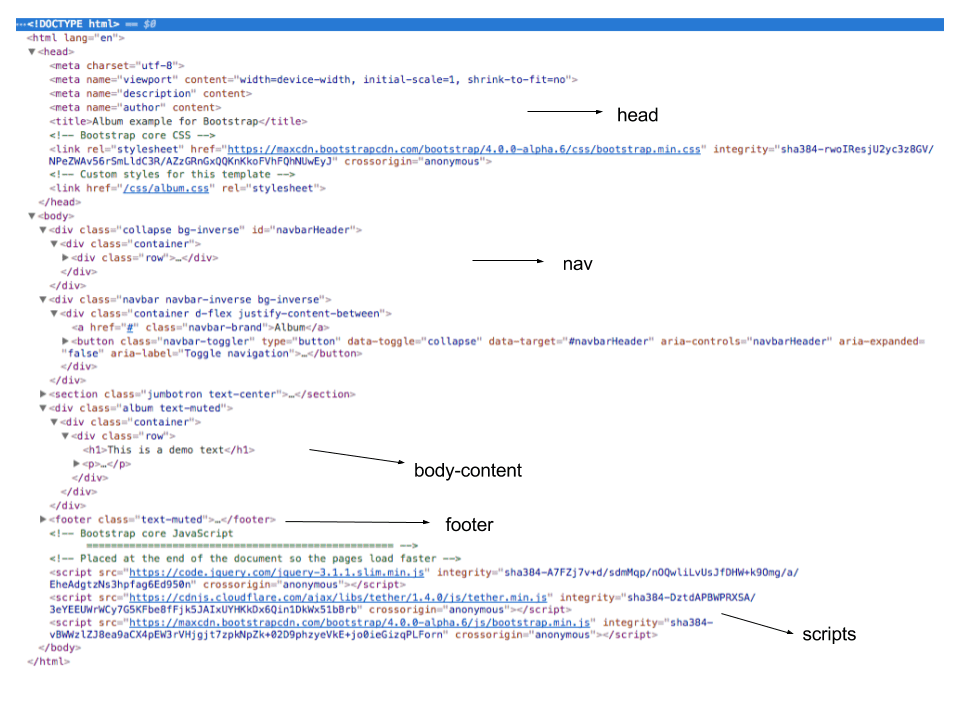
As you can see in the bootstrap example source code, a file consist of a different parts, and we will create a layout in which we will keep all the partial parts of the layout separate.
Create a file
mainlayout.blade.php in your layout folder.
<!DOCTYPE html>
<html lang="en">
  <head>
    @include('layout.partials.head')
  </head>

  <body>

	@include('layout.partials.nav')

        @include('layout.partials.header')

	@yield('content')

	@include('layout.partials.footer')

	@include('layout.partials.footer-scripts')


  </body>
</html>
This file contains the key elements of our html page and we have made use of blade template methods such as
@include and
@yield. @include will include the contents of specified file at the desired location inside the HTML file. @yield will put the specified content of file which is extending this layout. We will understand more about @yield further in this tutorial.
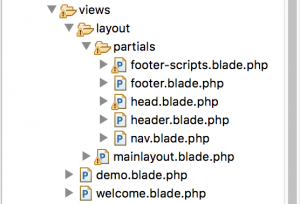
Create partial files.
Next we will create partial files which we have included in out mainlayout file. Create a
partials folder inside the layout folder which will contain the partial files like (head, header, footer etc) . Now start creating the partial files.
Create a file
head.blade.php . This file will contain the content that goes into the head section of the webpage, that includes meta tags, css files etc. Bootstrap css file (bootstrap.min.css) and the album theme specific file (album.css) are included in this file.
<meta charset="utf-8">
<meta name="viewport" content="width=device-width, initial-scale=1, shrink-to-fit=no">
<meta name="description" content="">
<meta name="author" content="">

<title>Album example for Bootstrap</title>

<!-- Bootstrap core CSS -->
<link rel="stylesheet" href="https://maxcdn.bootstrapcdn.com/bootstrap/4.0.0-alpha.6/css/bootstrap.min.css" integrity="sha384-rwoIResjU2yc3z8GV/NPeZWAv56rSmLldC3R/AZzGRnGxQQKnKkoFVhFQhNUwEyJ" crossorigin="anonymous">


<!-- Custom styles for this template -->
<link href="/css/album.css" rel="stylesheet">
Create a file
nav.blade.php . This file will contain the code related to creating the navigation of bootstrap page.
    <div class="collapse bg-inverse" id="navbarHeader">
      <div class="container">
        <div class="row">
          <div class="col-sm-8 py-4">
            <h4 class="text-white">About</h4>
            <p class="text-muted">Add some information about the album below, the author, or any other background context. Make it a few sentences long so folks can pick up some informative tidbits. Then, link them off to some social networking sites or contact information.</p>
          </div>
          <div class="col-sm-4 py-4">
            <h4 class="text-white">Contact</h4>
            <ul class="list-unstyled">
              <li><a href="#" class="text-white">Follow on Twitter</a></li>
              <li><a href="#" class="text-white">Like on Facebook</a></li>
              <li><a href="#" class="text-white">Email me</a></li>
            </ul>
          </div>
        </div>
      </div>
    </div>
    <div class="navbar navbar-inverse bg-inverse">
      <div class="container d-flex justify-content-between">
        <a href="#" class="navbar-brand">Album</a>
        <button class="navbar-toggler" type="button" data-toggle="collapse" data-target="#navbarHeader" aria-controls="navbarHeader" aria-expanded="false" aria-label="Toggle navigation">
          <span class="navbar-toggler-icon"></span>
        </button>
      </div>
    </div>
Create file
header.blade.php , This file will usually contain your visible header of bootstrap page (Your logo, name etc)
<section class="jumbotron text-center">
      <div class="container">
        <h1 class="jumbotron-heading">Album example</h1>
        <p class="lead text-muted">Something short and leading about the collection below—its contents, the creator, etc. Make it short and sweet, but not too short so folks don't simply skip over it entirely.</p>
        <p>
          <a href="#" class="btn btn-primary">Main call to action</a>
          <a href="#" class="btn btn-secondary">Secondary action</a>
        </p>
      </div>
</section>
Create a file
footer.blade.php, This file will usually contain your website footer part.( Copyright information, footer links etc.)
<footer class="text-muted">
<div class="container">
<p class="float-right">
<a href="#">Back to top</a>
</p>
<p>Album example is © Bootstrap, but please download and customize it for yourself!</p>
<p>New to Bootstrap? <a href="../../">Visit the homepage</a> or read our <a href="../../getting-started/">getting started guide</a>.</p>
</div>
</footer>
Create a file
footer-scripts.blade.php , This file will contain the Javascript files which are usually included at the bottom of the page. jQuery library, and bootstrap js library are included in this file.
<!-- Bootstrap core JavaScript
================================================= -->
<!-- Placed at the end of the document so the pages load faster -->
<script src="https://code.jquery.com/jquery-3.1.1.slim.min.js" integrity="sha384-A7FZj7v+d/sdmMqp/nOQwliLvUsJfDHW+k9Omg/a/EheAdgtzNs3hpfag6Ed950n" crossorigin="anonymous"></script>
<script src="https://cdnjs.cloudflare.com/ajax/libs/tether/1.4.0/js/tether.min.js" integrity="sha384-DztdAPBWPRXSA/3eYEEUWrWCy7G5KFbe8fFjk5JAIxUYHKkDx6Qin1DkWx51bBrb" crossorigin="anonymous"></script>
<script src="https://maxcdn.bootstrapcdn.com/bootstrap/4.0.0-alpha.6/js/bootstrap.min.js" integrity="sha384-vBWWzlZJ8ea9aCX4pEW3rVHjgjt7zpkNpZk+02D9phzyeVkE+jo0ieGizqPLForn" crossorigin="anonymous"></script>
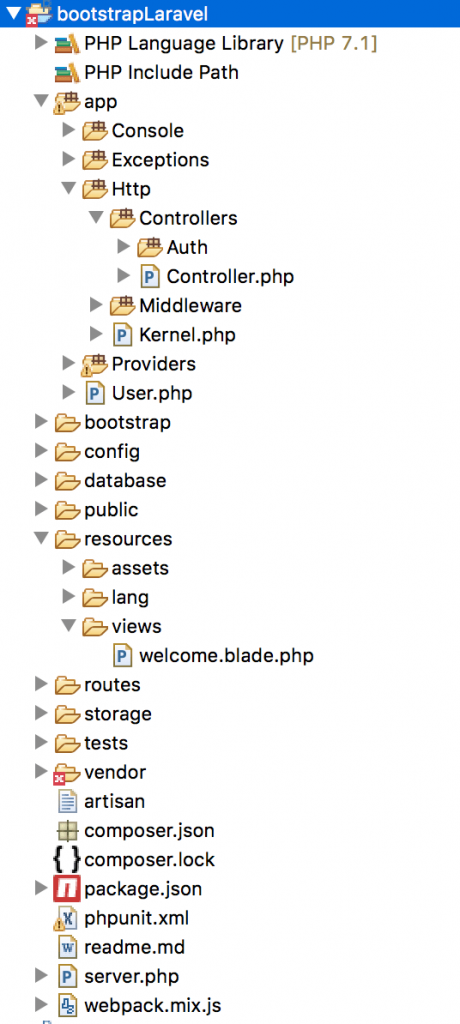
After creating all the views files, your views folder should looks something like this.
We now have all our layout file ready and also the necessary file which are required to complete the layout are ready in our partials folder.
Extending layout.
Let's create a view file that extends this layout file, so that we can see bootstrap layout integration with Laravel blade template in action.
Create a file
demo.blade.php in your views folder and put the following contents in this file.
@extends('layout.mainlayout')

@section('content')
    <div class="album text-muted">
      <div class="container">

        <div class="row">
          <h1>This is a demo text</h1>
		  <p>Lorem ipsum dolor sit amet, consectetur adipiscing elit. Sed egestas dolor vulputate quam convallis consequat. Quisque eu lorem eget magna lacinia suscipit. Maecenas condimentum vehicula eros. Fusce massa lacus, blandit et leo sed, accumsan commodo sem. Sed eget pulvinar tellus. Praesent ex diam, sodales at consequat id, viverra ut dolor. In eget orci sit amet magna sagittis mattis sit amet sed augue. Vivamus facilisis libero ligula, vel sodales ipsum sollicitudin id. Duis vitae urna rutrum, dignissim arcu ac, elementum augue. Quisque id interdum ligula. Donec tincidunt feugiat massa sed aliquam. Duis eu vehicula turpis.</p>
		</div>
      </div>
    </div>
@endsection
@extends method from blade template denotes which layout we want to extend as there can be multiple layouts in our project. The
@section('content') creates a section with name content. Thus whenever blade engine will encounter
@yield('content') in the layout file it will spit out the content section in that place.
Now to see the page in browser we need to add a route action in routes > web.php file.
Route::get('/demo', function () {
    return view('demo');
});
Now if you hit the demo url in your browser you should see our bootstrap integration in action.